Medical: Articulatio talocruralis
English: talocalcanean joint
The upper ankle joint, often referred to as the ankle, is made up of three bones. The outer ankle (fibula = Fibula) forms the outer ankle fork; the shin (Tibia) forms the inner ankle fork. In order to transfer the force to the foot, the talus forms (Talus) the joint opponent. The ankle fork (malleolar fork) made of the tibia and fibula surrounds the ankle bone in a U-shape. The calf and shin bones are connected by a very tight ligament (syndesmosis).
$config[ads_text1] not found
The upper ankle is stabilized by a tight capsular ligament device.
There are three important stabilization bands on the outside of the ankle:
On the medial malleolus, the most important stabilizing ligament is the deltoid ligament.

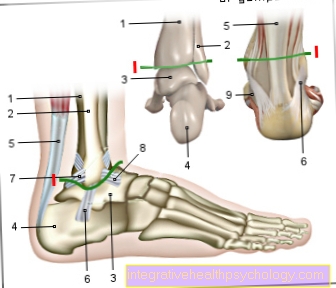
I - Upper ankle
(Joint line green) -
Articulatio talocruralis
You can find an overview of all Dr-Gumpert images at: medical illustrations
$config[ads_text2] not foundThe ankle joint receives its from various ligaments stability.
However, these ligaments are also the weak point of the joint because they move quickly overstretch or even tear can.
One distinguishes one Outside- of a Inner ligament complex.
Of the Outer band complex is made up of three bands by different ones Tarsus pull towards the outside of the fibula. The naming of the ligaments is based on the names of the tarsal bones and the lower leg that they connect.
Of the Inner ligament complex consists of a flat, fan-shaped complex of ligaments, which is called Deltoid ligament or delta band. The delta ligament, in turn, is made up of individual ligament sections or "ligaments", namely from the shin-scaphoid part (pars tibionavicularis), from the anterior and rear shin-ankle parts (pars tibiotalaris anterior and posterior), and from the shin bone - heel bone part (pars tibiocalcanea). The outer ligament complex in turn consists of three ligaments, namely two, which connect the ankle and fibula in front and behind (ligamenti talofibulare anterius and posterius), as well as a ligament, which heel and Fibula connects (calcaneofibular ligament). The fibula and tibia, which together form the ankle joint, are reinforced on the front and back by a band, which is known as the anterior and posterior tibiofibular ligament (Ligamenti tibiofibulare anterius and posterius).
$config[ads_text3] not found
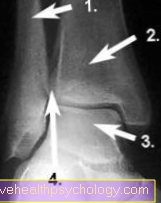
As already mentioned to back up the ankle ligaments can be injured quite quickly. The classic accident / injury mechanism provides this Twist The outer ligament complex is particularly often affected by injuries, for example when twisting shoes with high heels. On the one hand, the bony stability is lower in this foot position, on the other hand the ligaments are tense and tend to overstretch, be pulled or, in the worst case, tear.In addition, the ankle ligaments are injured, especially during sports, and cause them to work 20% a large part of sports injuries.
$config[ads_text2] not found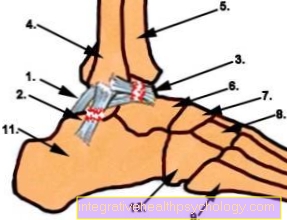

The upper ankle (OSG) takes the force from the shin and transfers it to the lower ankle (USG). From there the force on the ground, respectively, forefoot and Rear foot distributed.
At the upper ankle (OSG) it is a hinge joint with minimal possibility of rotation.
A healthy ankle joint can be pinned about 20-25 ° (extension = toes towards the tip of the nose) and bent about 30-40 ° (flexion = toes towards the floor).
The outer edge of the foot can be raised approx. 10 ° (eversion); the inner edge of the foot can be raised approx. 20 ° (Supination). This mobility is possible through the lower ankle joint.
$config[ads_text4] not found
With its mobility, the ankle enables a fluid gait pattern.

Who am I?
My name is dr. Nicolas Gumpert. I am a specialist in orthopedics and the founder of .
Various television programs and print media report regularly about my work. On HR television you can see me every 6 weeks live on "Hallo Hessen".
But now enough is indicated ;-)
Athletes (joggers, soccer players, etc.) are particularly often affected by diseases of the foot. In some cases, the cause of the foot discomfort cannot be identified at first.
Therefore, the treatment of the foot (e.g. Achilles tendonitis, heel spurs, etc.) requires a lot of experience.
I focus on a wide variety of foot diseases.
The aim of every treatment is treatment without surgery with a complete recovery of performance.
Which therapy achieves the best results in the long term can only be determined after looking at all of the information (Examination, X-ray, ultrasound, MRI, etc.) be assessed.
You can find me in:
Directly to the online appointment arrangement
Unfortunately, it is currently only possible to make an appointment with private health insurers. I hope for your understanding!
Further information about myself can be found at Dr. Nicolas Gumpert

The ankle tape initially consists of two parts, namely a basic tape, which in turn consists of a U-reins and a figure-eight reins, as well as so-called transverse pulls. The basic tape serves as a preventative stabilization in sports that put stress on the ankle, such as long runs. The transverse pulls are particularly important in the case of an already unstable ligament apparatus, as they can give it the desired stability under load.
In the following example we assume that the Inner ankle has a problem. If you have the problem with the outer ankle, you can "mirror" the instructions on this, i.e. everything that started / ended here on the inner ankle begins / ends on the outer ankle. It is advisable to read the instructions through completely before starting.
$config[ads_text1] not foundThe first step consists in attaching the U-reins. First, however, the correct length of the tape must be determined. To do this, hold your foot as if you were standing upright on the floor, with the tips of your feet pointing forward. Now place the tape 3-4 cross fingers above your inner ankle without gluing it, pull it vertically under your heel and end 3-4 cross fingers above the outside ankle. Once you have cut the tape, bring your foot into the position it was in when you cut it. Now put the tape over the inner ankle and stick it under train over the painful or unstable area towards the sole of the foot. As soon as you have reached the sole of your foot, loosen the tension on the tape and apply it without tension under the heel on the other side up to the outer ankle. Make sure that all tapes are attached without creases.
The second step consists in attaching the Figure eight reins. Cut this again at both ends 3-4 cross fingers longer than the U-reins. Bring your foot into the so-called "neutral position" already described. The tape will now central placed on the rear end of the sole of the foot and should almost completely cover the already attached U-rein at this point. Now the tape is over the Instep crossed, i.e. the inside part of the tape is glued towards the outside, the outside part towards the inside. Care should be taken to ensure that the tape is attached to the diseased foot side with a slight tension. In our example, with the fastening from the inside out.
The third and final step consists in attaching the Cross trains. These cut about one Hand length long to. Again, make sure that your foot is in the neutral position before taping. The transverse pull is applied at the level of the unstable and / or painful area on the back of the lower leg and with full train taped over the unstable / painful area towards the little toe. If there is a problem with the outer ankle, they stick under full tension in the direction of the big toe. Since, depending on the extent of the problem, different numbers of cross-pulls are required, which in the case of this are glued in a fan-shaped manner, it is advisable to place the ankle joint after each application of a cross-pull to load brieflyto test whether the desired stability has already been achieved.

The ankle joint reaches about strong Tapes its stability and cohesion. Unfortunately, these ligaments are also the major weak point of the joint, as they can often be pulled or overstretched, especially in connection with sport and / or inconvenient twisting and, in the worst case, tear.
Above all, overuse, such as strains and overstretching, can be prevented by strengthening the muscles from which the corresponding tendons arise.
$config[ads_text2] not found
It will now five exercises imagined that ideally barefoot and should be done with dry feet. It is advisable to read the corresponding description once through before starting each exercise.
First exercise
To get warm, first stand up straight on both legs. The legs should be at hip height. Stand on your heel with both feet and roll your feet forward until you are on your toes. From here, roll your foot backwards until you are back on your heel. Repeat this roughly 20 times.
Second exercise
Find a free-standing one wall and stand at a distance of 30 cm in front of them so that their backs point towards the wall. Now slowly lean back until your back hits the wall and you are just standing on your heels. So you are now in the so-called "Heel stand". In this position, try to pull your toes towards the tip of your nose as best you can, as this will allow the ankles to bend further. Then straighten up again so that the toes move towards the floor. Make sure your toes never touch the ground completely. It helps to imagine that the ground is fragile. Repeat the above exercise 15 – 20 times. Before doing the next exercise, you should take a short break.
Third exercise
As in exercise 1, stand in the Heel stand. It is advisable to lean your back against the wall, as this will give you a secure stance. Here, too, pull your toes towards the tip of your nose as best you can and then lower your foot towards the floor. Now, however, you need to be careful that you 2-3 Stop cm from the ground. Then, starting from this position, pull the tips of your feet as far as you can towards the tip of your nose. Raising and lowering should follow one another quickly and, if possible, there should be no long breaks between repetitions. Carry out the toe-lift operations - foot lowering as in the first exercise 15- 20 times through.
The exercises already presented serve as an introduction and are well suited for beginners. For the following exercises, the ankles should already be somewhat strengthened. This can be achieved by consistently doing the first and second exercise for two to three weeks.
Fourth exercise
Stand on your heels and roughly try 15 to 20 Meters to walk on this.
Fifth exercise
For this exercise you take the starting position of the second exercise. Before you begin, lift one leg so that your weight is only on one leg. With your leg on the floor, you now carry out the operations described in exercise 2. Repeat this 15 to 20 times.